 Loading asset information.
Make/Model: Dewalt 26677
Documentation: Manual PDF
Purchase Links: Blades
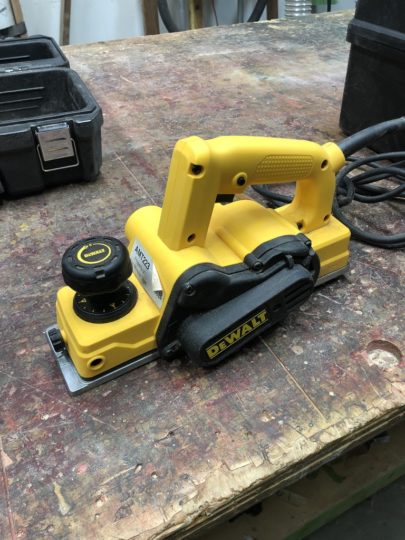
Used primarily to level surfaces, but can also be used to “joint” shorter pieces that are too wide for the jointer bed. Unlike the jointer or planer in our shop, the powered hand planer can be used to surface glued up pieces and some wood composites. It can be used on wood that contains glue, epoxy or resins. It should not be used on pieces that are majority non-wood. It should also not be used on MDF, end grain or plywood; MDF can clog up the mechanisms, and end grain and plywood are dangerous to work with this tool. Like with a jointer, planer or router, grain direction is a consideration when using this tool. No plastics!
Inspect Before Use
- Check the power cable to ensure it is not damaged
- Ensure that the kickstand is operational
- Ensure that the tool has not been left in a “locked-on” position.
- The tool should be unplugged
- Give the trigger a squeeze and release. This will disengage the lock on button if it was left engaged
- Inspect the blades to see if there is any noticeable damage
- Check the dust port and any vents on the machine for clogs, and clear them out if necessary
- Plug the tool in and give it a test run
Safety
- This tool is just as dangerous as the jointer, possibly more so
- Pay attention to where you’re pointing it, or setting it down!
- Clamping workpieces down in a way that is safe to use this tool (i.e. the tool will not run into the clamps) can be tricky. Be prepared to shift your clamps as you work
- Always operate the tool from the rear, do not pull it towards you
- If you’re workpiece is not properly clamped, it is possible for the tool to shoot it away from the cutting blades and out from under the front of the machine
- It is still possible for pieces of your work piece to shoot out away from the tool, even if the piece is well clamped
- Ensure that no one is standing in front of you when using this tool
- If the tool kicks back, it will come back towards the operator
- Always keep two hands on the tool during operation; one on the front knob/depth adjustment, and one on the handle
- Let the blades come fully up to speed before touching them to your work piece
- Cut with the grain and take shallow passes
- Do not cut across the grain
- Let the blades fully spin down before setting the tool down
- If they are still spinning, and the kickstand engages, it can walk itself across a surface…which can be at minimum hazardous to the health of the tool, or cause injury in the worst case
- Unplug the tool when not in use
- It is best to change depth of cut when the tool is not running
- Make sure that you periodically check the dust collection port to ensure that clearing out the debris
Making a Cut
- Always use dust collection (this tool can be connected to the mini cyclone attached to the sanding station/router table)
- Ensure that your workpiece is properly clamped
- Adjust your depth of cut
- Each click is an adjustment of 0.1 mm
- The max depth of cut it can handle is 1/16”
- Do not take more than a 1/32″ in a single pass
- Place the front shoe completely flat on the workpiece, but positioned so that the blades are not making contact
- Pull the trigger and bring the blades up to full speed
- You may opt to lock the tool on, though it is not advised
- To do so, pull the trigger in, press the lock-on button in, and slowly release the trigger
- To disengage the lock-on button, squeeze the trigger in and release
- Maintain even pressure as you run the planer the length of your workpiece
- As you reach the end, you will want to ensure the the REAR shoe is flat on the board until the blades have cleared it
- Alternatively, you could place a piece of scrap of equal height at the end of your workpiece to serve as a “run-out” board
- To plane a wide surface, take multiple overlapping passes
- To chamfer an edge, use the chamfer channel on the front shoe to properly line up on a corner
- It can be difficult to take a second pass on an edge that has already been chamfered. Get it right the first time
- To cut a rabbet, attach the fence and adjust it to the width you desire
- The tool can cut one up to 23/64″ (9 mm) wide
- This tool operates most similarly to the jointer
- There is no need to adjust the depth of cut between leveling passes unless you wish to change the amount cut in a single pass
Maintenance
- When done, unplug the machine and inspect the dust and vent ports for any clogging
- Clean if necessary
- Check the blades for any damage prior to putting away
- Stewards or approved maintenance volunteers will change blades when necessary
Logs
Loading asset logs.